gravel bike 26 zoll kinder Kinderfahrrad 10 bis 14 Jahre 26 Zoll für Straße, Gravel und Cyclocross
SKU: 56699793834
gravel bike 26 zoll kinder

gravel bike 26 zoll kinder Kinderfahrrad 10 bis 14 Jahre 26 Zoll für Straße, Gravel und Cyclocross

Sale price$24.08 Regular price$26.76
Save 10%

Pay in installments of $6.69 with ShopPay, AfterPay and Klarna

Shipping Estimate
USA
  • USA
  • CAN

Ships within 48 hours · Estimated delivery Jul 3 - Jul 8

Promo Codes Available:

For Your Every Summer RSVP, with Code: SUMMER15

Description

gravel bike 26 zoll kinder Kinderfahrrad 10 bis 14 Jahre 26 Zoll für Straße, Gravel und CyclocrossKinder Fahrrad Bemoov 26 Zoll fr Strae, Gravel oder Cyclocross Das Bemoov 26 Zoll Kinder Fahrrad ist fr junge Sportlerinnen und Sportler entwickelt, die sich auf verschiedenen Gelndearten wagen mchten: Strae, Gravel oder Cyclocross. Ideal fr Freizeit oder Wettkampfeinsatz, ist es auch perfekt fr Abenteuer im Bikepacking. Mit einem Gewicht von nur 8,9 kg, einem Aluminiumrahmen mit dreifacher Konifizierung und einem ergonomischen Design, das speziell fr

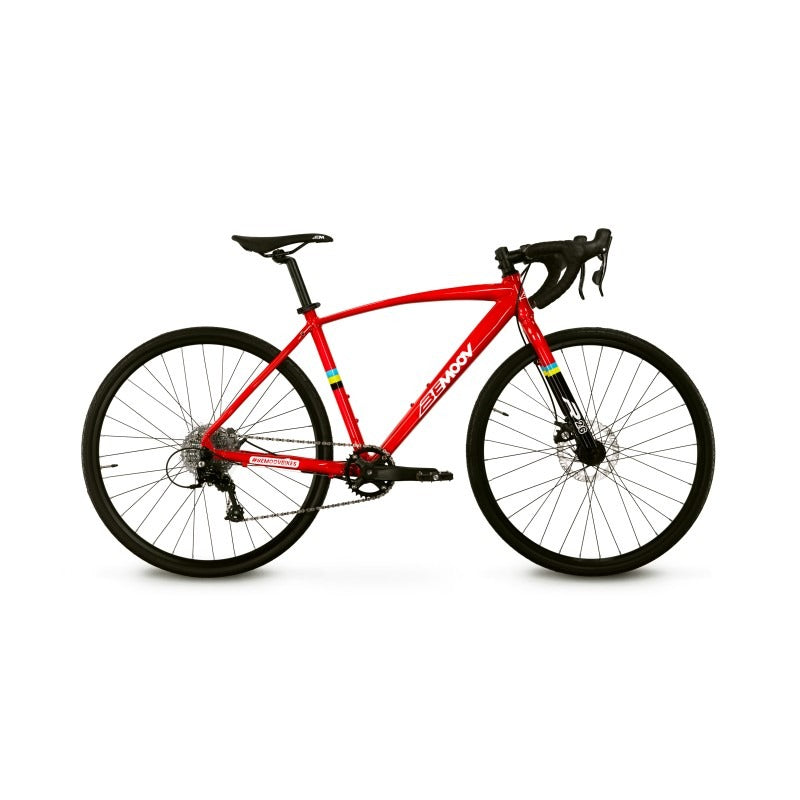
Kinder-Fahrrad Bemoov 26 Zoll für Straße, Gravel oder Cyclocross

Das Bemoov 26 Zoll Kinder-Fahrrad ist für junge Sportlerinnen und Sportler entwickelt, die sich auf verschiedenen Geländearten wagen möchten: Straße, Gravel oder Cyclocross. Ideal für Freizeit- oder Wettkampfeinsatz, ist es auch perfekt für Abenteuer im Bikepacking. Mit einem Gewicht von nur 8,9 kg, einem Aluminiumrahmen mit dreifacher Konifizierung und einem ergonomischen Design, das speziell für junge Champions und Championinnen entwickelt wurde.

Kinder-Fahrrad mit Microshift-Schaltung, leichten Komponenten und 2 Reifensets

Das Bemoov 26 Zoll bietet Komponenten, die auf Leichtigkeit, Haltbarkeit und Anpassungsfähigkeit ausgelegt sind. Es ist mit einem leichten Aluminiumrahmen AL6061 ausgestattet, der eine Geometrie für einfaches Aufsteigen und eine niedrige Sitzposition bietet. Die 26-Zoll-Räder aus Aluminium 6061 sind leicht und robust. Sie verfügen über eine eloxierte Doppelwand mit Verschleißanzeige, 28 gekreuzte Edelstahlspeichen und Naben aus Aluminium mit Kassettenlagern. Die leichte AL6061-Aluminiumgabel ist mit einem optimierten Steuerrohrwinkel ausgestattet und kombiniert Agilität mit Stabilität. Zwei Reifensets von Kenda sind enthalten: Road 26x1.25 für glatte Oberflächen und Gravel/CX 26x1.5 für gemischtes Gelände.

Ergonomische und anpassbare Ausstattung

Das semi-integrierte Steuersatzsystem umfasst einen Stern und eine obere Kappe aus Aluminium. Verstellbare Spacer ermöglichen die Anpassung der Lenkerhöhe, um mit dem Wachstum des Kindes mitzuhalten. Der Sattel, der bequem und an die Anatomie von Kindern angepasst ist, verfügt über seitliche Schutzvorrichtungen für eine längere Lebensdauer. Die Sattelstütze aus eloxierter Legierung (27,2 x 300 mm) ist leicht, robust und höhenverstellbar, um das Wachstum des Kindes zu begleiten.

Zuverlässige Schaltung und Bremsen

Die Schaltung basiert auf einer Kassette von Microshift mit 10 Gängen (CS-H100 11x36t), die Vielseitigkeit für verschiedene Geländetypen bietet. Die Tektro-Scheibenbremsen vorne und hinten verwenden 160-mm-Scheiben, die präzise Kontrolle und optimale Sicherheit gewährleisten. Das Fahrrad wird außerdem mit grundlegenden Werkzeugen für Einstellungen geliefert, darunter ein 15-mm-Maulschlüssel und drei Inbusschlüssel in den Größen 2, 4 und 5 mm.

Welches Alter für ein 26-Zoll-Fahrrad?

Ein 26-Zoll-Fahrrad ist in der Regel für Kinder im Alter von 10 bis 14 Jahren geeignet, die eine Körpergröße zwischen 135 und 160 cm haben. Es ist jedoch empfehlenswert, die Größe des Kindes und die Schrittlänge für eine perfekte Anpassung zu berücksichtigen, um Komfort und Kontrolle zu gewährleisten.

Wie misst man die Schrittlänge Ihres Kindes?

Um die Schrittlänge Ihres Kindes zu messen, stellen Sie sicher, dass es seine normalen Schuhe trägt und gerade gegen eine Wand steht, mit den Fersen fest an der Wand. Messen Sie dann den Abstand zwischen dem Boden und der Oberseite des Oberschenkels. Für mehr Präzision platzieren Sie ein Buch waagerecht zwischen den Beinen des Kindes und messen Sie den Abstand zwischen dem Boden und der Oberkante des Buches. Konsultieren Sie die Größentabelle im Bemoov-Größenleitfaden, um das am besten geeignete Modell auszuwählen.

Shipping Notes
  • Free Standard Shipping on $100+ Orders to the USA.
  • Except Preorder products are shipped in 48 hours.
  • Delivery to the USA:
  1. Standard Shipping : 3-10 business days
  • If time is of the essence, please consider selecting expedited delivery for faster service.
Exchange/Return Notes
  • We offer a 30-day return/exchange service after receiving.
  • Final sale items are not eligible for returns or exchanges.
  • To process your return/exchange, please contact us at [email protected]
  • Please click here for more details>>> Return & Exchange Policy
SKU: 56699793834

Discover Niche Categories That Outsell gravel bike 26 zoll kinder

Top-Converting Item to Boost Your Average Order

4.1 ★★★★★
Based on 483 reviews
Sort
Highest Rating
Newest First
Oldest First
Product Reviews
A
Verified Purchase
AB
Whiting, US
★★★★★ 5
High quality and robust
Size: 12 Pairs, Pattern Name: Banana Plugs
Easily the best plugs I've found at a reasonable price. Solid feeling with good quality and they look good with easy to see red/black labeling. The tips tend to unscrew too easily, but this is a non-issue when they are in use, just something you have to be careful not to lose when assembling. It's a bit tricky to spread the wire out evenly at the exact right length. If screwing the plug together is hard at all, go back and shorten how much wire you bend over the lip.
WAS THIS REVIEW HELPFUL?YesReportShare
Reviewed in the United States on June 16, 2025
W
Verified Purchase
William
Grantham, US
★★★★★ 5
Solid banana clips
Size: 5 Pack, Pattern Name: Banana Plugs
Ah yes, I used these solid banana plugs to convert my wires. It’s pretty easy to set up once the wire housing has been stripped and really cleans things up nicely. I haven’t had any discernable hissing, noise problems, or connection issues.
WAS THIS REVIEW HELPFUL?YesReportShare
Reviewed in the United States on May 25, 2026
L
Verified Purchase
Leyland Cypress
Houston, US
★★★★★ 3
Get the right wire guage
Size: 1 Count (Pack of 1), Pattern Name: Banana Plugs
I rate the banana plugs themselves 4 stars. They are everything I expected and work as advertised. It's the experience of assembly that I rate three stars. The way these work is -- you strip off the outer insullation of your wire and separate the two leads (positive and negative). Then you strip some length of insulation off the end of one of your leads, you unscrew the banana plug so that it separates into its respective base (lower) and contact (upper) halves, you slip the wire up through the base, you flare the copper strands of the wire and fold the individual strands over the very top of the base (about 1/16 of an inch) (taking care not to extend the strands over the threaded barrel of the base), then you screw the upper contact onto the lower base and voila, banana plug / wire assembly. It's not as complicated as it sounds. Go to the Monoprice website and watch their excellent instructional video. Here's the thing though. While the assembly is not complicated, it is tricky, and if you don't get your proportions right the first or second or third time, you'll have to do it over. Fist of all, if your wire guage is relatively thin, like my 16-guage speaker wire, you'll find that the entire wire, insullation and all, will slip right through the base of the plug without butting up against the bottom of the base. If this is the case, then the wire is left to sort of flop around inside the plug and that has a kind of unfinished, amateur look and feel to it, whereas if the wire butts up against the bottom of the base, it has a solid, one-piece professional look. So, to my mind, there's a sweet-spot for wire guage that works best with this plug -- not too thin and not too thick. And since Monoprice has debunked the thicker-is-better myth (the quality of the copper is the real determinant), then you should feel free to get the wire guage that fits the plug. Next -- and here's where it gets tricky -- once your copper extends beyond the top of the base, you'll need to limit this extension to about a sixteenth (no greatrer than a fourth) of an inch. Then you very delicately flare out the individual strands, in a 360- degree arc, and fold the strands over the top of the base. This takes a fair degree of manual dexterity, especially if the wire is "floating" inside the base and its travel is not stopped where the insullation meets the base. You'll have to hold the wire and base steady in the fingers of one hand, then flare out the wire strands with either your fingers or a suitable object (the working end of a ball-point pen worked for me) with the other hand. This one-sixteenth measure is important. If you extend wire strands beyond the top and over the threads of the base, you'll find that screwing the contact end onto the base is impossible and you'll need to start over. One or two strands is OK and almost unavoidable. In that case the screwing will catch but if you take a pair of pliers to it you can muscle through. By the way, you can avoid the whole mess by getting the open-screw type, which I'm sure will work just as well without any of the hassle of assembly. Like anything else, if you do it a few times to make the mistakes and learn the tricks, then it will become second nature, and if you've already done that, then my review might seem overly fussy. In that case feel free to leave comments to help other readers.
WAS THIS REVIEW HELPFUL?YesReportShare
Reviewed in the United States on October 15, 2012
J
Verified Purchase
JBDoge
Carnegie, US
★★★★★ 5
Wish they came with instructions...
They are cheap and work great. They plug right into my Pioneer vsx521 receiver and my Paradigm Atom monitor speakers. I wish they came with instructions, because it took me about 10 minutes to realize the bottom part unscrews in addition to the top part. Here are my instructions for installation: 1) Unscrew the bottom part of this connector (the thin metal underneath the red/black ring). 2) Make sure the Banana Plug (which may be loosely screwed into the top part of the connector) is fully tightened down 3) Strip your wire tips to 3/8 of an inch (or just slightly under) 4) Run the first newly stripped wire end through the bottom part you removed in step 1, such that the stripped end of the wire is entering through the flat end and exiting through the smaller threaded end. 5) Leave about 1/8 to 3/16 of an inch of stripped wire hanging past the exit hole. 6) As evenly spaced as possible, bend the over-hanging wire strands over the exit hole (all around it, like a hat). If done properly, the wire should not fall out if you give it a VERY GENTLE tug. 7) Screw the top metal part (with the actual banana plug) back onto the bottom part. It may be difficult if your stripped wire is hanging too low. I've used a pair of pliers to grip the bottom part of the connector while I twist the banana plug side with my hand. If done correctly, you should be able to put a lot of tension between the wire and connector without removing/damaging it. UPDATE: I just recently helped my dad install his 5.1 system without these... it sucked... This item (5 pairs of them in this case) and a good wire stripper can save you alot of pain (both physical and mental). The connectors on the back of his receiver are the kind where bare wire comes in from the side and then the connectors screw down (with a banana plug hole in the center which is where this product would come into play). I felt like a surgeon trying to get a bare wire end into the little slot, and then holding it there while I tighten the connector which is almost impossible since they are so close together... GET THESE!
WAS THIS REVIEW HELPFUL?YesReportShare
Reviewed in the United States on February 8, 2012
R
Verified Purchase
R. Jackson
Omaha, US
★★★★★ 1
'Monoprice' = Worst stereo banana plugs on T-H-E market.
Size: 5 Pack, Pattern Name: Banana Plugs
The absolute WORST in stereo banana plugs - HANDS DOWN. After installing stereos and components for over 30 years, I'd say I'm experienced. These banana plugs fail at EVERY part of the design. Allow me to explain... 1) Starting with the tips, they are loose off the bat and fit LOOSELY in either the stereo input studs or speaker input studs by their 'girth'. They do not firmly seat in any plug and for this setup, I'm using a nearly $2K setup all together. They 'rock' back and forth (when inserted) and thus create a non-permanent connection, again, seriously making these utter junk. I've seen some items you can get by with over the years, but these aren't even rock bottom. They are unusable! 2) Next, the banana plugs themselves comes as three pieces. No non loosening o-ring seal but a plastic colored want-to-be imitation for positive and negative notation. Why do these stupid things come in three pieces? - I simply can't tell you why. I do know they serve no specific piece to solving the puzzle of installation so why do they come in three pieces...? My speculation is they are cheap china knockoffs. 3) The 'way' in which you normally install the trimmed wiring internally with the 'two-piece' design permits you to firmly CRIMP and hold the unsheathed wiring; but these do not. The overlap/overlay of the exposed wiring can only be about 2/16's of an inch thus not much to create a proper connection with. This single fact eliminates these plugs as even worthwhile component add ons; period. If you can't achieve a good ground/wiring connection, these are a defeated purpose... 4) Because of the design of these, they have no room to crimp and screw on the cable so your forced to nearly break your fingers in an attempt to get the unsheathed wire to overlay the internal threading and twist them on with all your might. This in effect breaks nearly every wire thread internally and then they breaks off inside. Absolute garbage. These are total pieces of non-quality junk that did nothing but makes me waste 30 minutes on attempting to get them securely on and another 25 to locate my Amazon account, find this product in my order and ALARM anyone else from making the same mistake I made. Now, I find out I can't even get a return on these. Thanks Amazon. Thank you third party retailer. You just made me a very dissatisfied decade long customer.
WAS THIS REVIEW HELPFUL?YesReportShare
Reviewed in the United States on August 17, 2016

recommand products